Deep cleaning your gas BBQ is essential for maintaining optimal performance, ensuring food safety, and extending your grill’s lifespan. Whether you’re preparing for winter storage or getting ready for peak grilling season, this comprehensive guide will walk you through every step of the deep cleaning process.
Why Deep Clean Your Gas BBQ?
Regular deep cleaning of your gas BBQ offers numerous benefits beyond just appearance. Grease buildup can cause flare-ups, affect food flavor, and even pose fire hazards. A clean grill also heats more evenly and efficiently, saving you propane and delivering better cooking results.
Most BBQ experts recommend a thorough deep clean at least twice per year – once before the heavy grilling season and once before winter storage. However, if you grill frequently, quarterly deep cleans will keep your equipment in peak condition.
Essential Tools and Supplies for Deep Cleaning
Before starting your deep clean, gather these essential items:
- Safety equipment: Heat-resistant gloves, safety glasses
- Cleaning tools: Grill brush, scraper, sponges, microfiber cloths
- Cleaning solutions: Degreasing spray, warm soapy water, baking soda
- Hardware: Screwdriver set, wrench set
- Container: Large bucket or sink for soaking parts
For the best results, invest in a GRILLART SteamWizards bristle-free grill brush designed specifically for safe cleaning. Traditional wire brushes can leave dangerous metal bristles on your grill grates, while bristle-free options like the Grill Rescue cleaning brush are much safer for porcelain-coated grates.

Step-by-Step Deep Cleaning Process
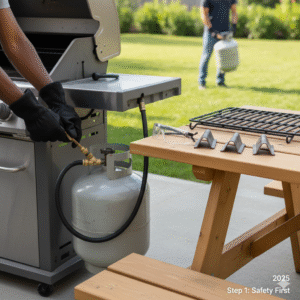
Step 1: Safety First – Disconnect and Cool Down
Always ensure your grill is completely cool before beginning any cleaning process. Disconnect the propane tank and move it to a safe location away from your work area. Remove the cooking grates, flavorizer bars, and any other removable components.
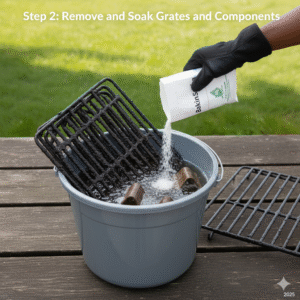
Step 2: Remove and Soak Grates and Components
Place your cooking grates, warming racks, and flavorizer bars in a large container filled with warm, soapy water. For heavily soiled items, add a cup of Arm & Hammer pure baking soda to help break down stubborn grease. Let these components soak for 30-60 minutes while you work on other areas.
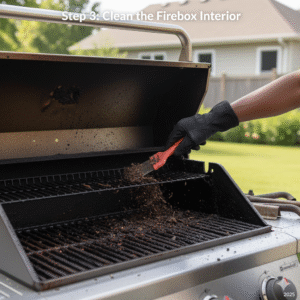
Step 3: Clean the Firebox Interior
Using a plastic scraper, remove built-up grease and debris from the firebox walls and bottom. Work systematically from top to bottom, scraping debris toward the grease management system. For stubborn buildup, apply a commercial BBQ degreaser and let it sit for 10-15 minutes before scraping. Alternatively, try Goo Gone Grill & Grate Cleaner for a citrus-based, natural cleaning solution.
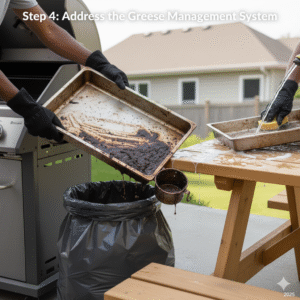
Step 4: Address the Grease Management System
Remove and empty the grease tray, then wash it thoroughly with hot, soapy water. Clean the grease cup and any grease channels, ensuring proper drainage. This step is crucial for preventing grease fires and maintaining proper airflow. Consider using disposable drip tray liners for easier future maintenance.
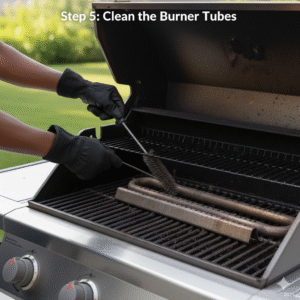
Step 5: Clean the Burner Tubes
Carefully remove the burner tubes according to your manufacturer’s instructions. Use a small bottle brush or pipe cleaner to clear any spider webs, debris, or corrosion from the gas ports. Inspect for any damage that might affect gas flow or create safety hazards.
Step 6: Scrub Soaked Components
Return to your soaking grates and components. Use a safe bristle-free grill brush or scrubbing pad to remove loosened grease and food particles. For cast iron grates, avoid soap and use coarse salt as an abrasive instead. For extremely stubborn buildup, try a natural pumice cleaning stone which works excellently on tough residue. Rinse thoroughly and dry completely to prevent rust.

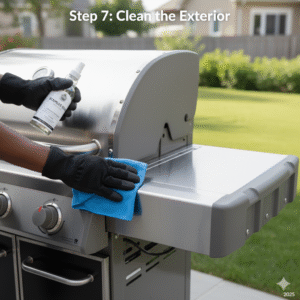
Step 7: Clean the Exterior
Wipe down the exterior with appropriate cleaners for your grill’s material. Stainless steel requires special cleaners to avoid streaking, while painted surfaces need gentler treatment. For a professional-grade clean, consider Weber Grill Cleaner Spray which is safe for all surfaces. Don’t forget to clean the control knobs, handles, and thermometer.
Reassembly and Testing
Once all components are clean and completely dry, reassemble your grill in reverse order. Ensure all connections are secure and gas fittings are properly tightened. Before your first cook, perform a leak test using soapy water on all gas connections.
Run your grill on high for 10-15 minutes to burn off any cleaning residue and verify proper operation of all burners. This also helps season clean grates and prevents rust formation.
Maintenance Tips to Reduce Deep Cleaning Frequency
Regular maintenance between deep cleans will keep your BBQ in better condition:
- Clean grates after each use while still warm with a safe bristle-free brush
- Empty grease trays regularly and use disposable liners for easy cleanup
- Cover your grill when not in use with a Weber premium grill cover
- Perform monthly quick cleans of high-use areas
- Check and clean burner ports seasonally
Following a comprehensive BBQ cleaning checklist helps ensure you don’t miss important maintenance tasks throughout the grilling season.
Complete Cleaning Solutions
For those who want everything in one package, consider investing in a Alpha Grillers complete BBQ tool set which includes spatula, tongs, fork, and cleaning brush. Alternatively, the complete grill maintenance kit provides everything you need for thorough grill care in one convenient package.
Common Deep Cleaning Mistakes to Avoid
Avoid these common errors that can damage your grill or create safety hazards:
- Using harsh chemicals on food-contact surfaces
- Cleaning a hot grill
- Forgetting to disconnect the propane tank
- Using steel wool on porcelain-coated surfaces
- Reassembling components while still wet
For more detailed information about cleaning mistakes, check out our guide on the worst BBQ cleaning mistakes to avoid costly damage.
When to Consider Professional Cleaning
While most BBQ owners can handle deep cleaning themselves, consider professional service if you encounter:
- Extensive rust or corrosion
- Gas line issues or leaks
- Damaged burner components
- Electrical problems in gas ignition systems
Frequently Asked Questions
How often should I deep clean my gas BBQ?
Deep clean your gas BBQ at least twice per year – once before peak grilling season and once before winter storage. Heavy users should consider quarterly deep cleans for optimal performance.
Can I use oven cleaner on my BBQ grates?
Avoid using oven cleaner on BBQ grates, especially those with porcelain coating. These harsh chemicals can damage surfaces and leave harmful residues. Stick to BBQ-specific cleaners like Goo Gone Grill & Grate Cleaner or natural solutions like baking soda and cleaning vinegar.
What’s the best way to clean porcelain BBQ grates?
Clean porcelain grates with warm soapy water and a soft brush or sponge. Avoid abrasive materials that can chip the coating. For stubborn buildup, use a plastic scraper and specialized non-toxic BBQ cleaners.
Should I oil my grates after deep cleaning?
Yes, lightly oil clean grates before first use to prevent sticking and help maintain the seasoning. Use high-heat cooking oil and apply with a paper towel while grates are slightly warm.
How do I know if my burner tubes need replacement?
Replace burner tubes if you notice rust holes, blocked gas ports that won’t clear with cleaning, or uneven flame patterns. These issues can affect cooking performance and safety.
Deep cleaning your gas BBQ might seem like a big job, but following this systematic approach makes it manageable and ensures your grill performs at its best. Regular deep cleaning not only extends your equipment’s life but also improves food safety and cooking results. Set a seasonal reminder to tackle this important maintenance task, and your BBQ will reward you with years of reliable service.